.png)


Daz’s Grooming Process
Double CoaT Grooming - The full breakdown!
Okay! Several people asked about my process for Daz’s groom and handling of double coats in general, and I’m happy to share what I’ve learned through continuing education and lots of trial and error with products and techniques.
Fair warning… grooming and coat care is one of my hyper fixations, so this is a bit of an info dump 😅

🧰 Setup
I have a mobile grooming van but atlas, Daz do not fit! I also don't have a beautiful grooming tub like some folks - I'm jealous and looking into getting something like that but instead I have to improvise... My set up is:
-
Rectangular dog pool
-
Modified grooming table (lower to the ground)
-
1/4 HP sump pump with 10 ft hose
-
Foam soap sprayer attachment
-
Hose sprayer with shower + jet functions
🧴 Products (and Why I Use Them)
Showseason Chrome Coat
Silicone-based. Adds slip to the coat so the undercoat releases easier. Also has a slight whitening/toning effect.
Showseason Amino Flex
Adds slip while strengthening the coat with proteins.
Les Pooch Hypoallergenic Crème Rinse
Lightweight hydration. I love this as a finishing conditioner because it can be used as a leave-in without weighing the coat down.
Chubbs Whitening Shampoo Bar
Perfect for legs. Easy to handle and gives a really thorough scrub. (not pictured)
Envirogroom True Blueberry Facial
Tearless, safe for the face, smells amazing, and has a whitening effect. (not pictured)
Optional Swaps:
Heavy dirt: swap Amino Flex → Envirogroom Deep Clean
Yellow stains: EZ Groom Crystal White
Finishing Touch:
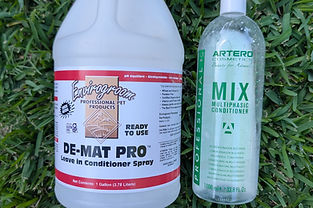
Envirogroom Pro-Mat detangling spray
Artero Mix conditioning spray
Warren London Grapeseed Oil for nose and paws

🪮 Tools (and Why I Use Them)
Protected Pin Bath Brush (Jelly Pet)
Helps work product deep into the coat while protecting the skin. Great for loosening undercoat at the follicle level.
Artero King Super Double Coat Rake
Pre-dulled so it doesn’t cut the coat. Double-sided (coarse + medium).
Artero 12” Poodle Comb
Long teeth to reach through dense coats and check for tangles.
Andis Ultra Fine Deshedding Tool
For shorter areas like legs, cheeks, ears.
Artero Carding Knife
Used to gently pluck loose undercoat, especially in ears and legs.
Chris Christensen Pin Brush
Used during drying to separate coat and remove loose undercoat.
K9 III High Velocity Dryer
Game changer. Extremely powerful and essential for blowing out undercoat.

⚠️ Tool Notes
-
I avoid slicker brushes and very fine combs
→ They can cause breakage, pull too hard, and create frizz -
Goal = smooth, hydrated, slippery coat, not fluffed and damaged
Rake Rule:
Always start coarse → then move finer
Only use ultra-fine tools on legs, face, ears to avoid coat damage
Use light pressure so you don't damage skin
🔁 Bathing Method: “Close – Open – Close”
This is my tried-and-true system.
This is the foundation of how I approach coat work on double-coated dogs. Each step is intentional and builds on the previous one to properly release undercoat, cleanse the coat, and reset the skin.
1️⃣ Close (Conditioner First)
The first “Close” step is about preparing the coat at a structural level.
Conditioner works by closing the hair shaft cuticle, which creates a smoother, more uniform surface along each strand. When the cuticle is closed, the coat becomes more “slippery,” which is exactly what we want when working with dense undercoat.
At the same time, conditioner binds to oils and built-up dander in the coat. As it’s worked through, it helps lift debris away from the skin and follicle, loosening the compacted undercoat.
This step is what allows the follicle to begin releasing shed coat more easily. Without it, the undercoat tends to stay compacted and resistant to removal as the natural oils in the coat "cements" the hair in the follicles.
2️⃣ Open (Shampoo + Mechanical Action)
The “Open” phase is where actual cleansing happens.
Shampoo, combined with mechanical action (friction), causes the hair shaft cuticle to open. This is necessary to allow the product to penetrate and properly break down oils, debris, environmental buildup, and staining within the coat.
I achieve this through:
-
Hand massaging for general distribution
-
A protected pin brush to push product deeper into dense areas and down to the follicle level
-
Using the sump pump to recirculate the shampoo and water through the coat. This saves product as you only need the proper dilution rate to a gallon or two of water.
The friction is key here. It’s not just about applying shampoo, it’s about activating it so it can do its job effectively.
Shampoo choice matters in this next step:
-
A more clarifying shampoo will strip more oils and buildup, requiring a heavier conditioner afterward to rebalance
-
A more hydrating shampoo will be gentler, so a lighter finishing conditioner is appropriate
This balance is what prevents over-drying or leaving the coat too heavy.
3️⃣ Close (Final Conditioner)
The final “Close” step is where everything is reset and stabilized.
After opening the cuticle and cleansing the coat, the hair shaft needs to be sealed again. Conditioner re-closes the cuticle, smoothing the surface of the hair and restoring hydration.
This step:
-
Locks in moisture
-
Protects the hair shaft
-
Re-establishes a healthy baseline for the skin and coat
If this step is skipped or not done properly, the coat is left in an open, vulnerable state. That can lead to:
-
Rapid oil overproduction
-
A quick return of odor (“wet dog smell”)
-
A dry, frizzy, unmanageable coat
💦 Rinsing Between Steps
Between each phase, I rinse intentionally, not just to remove product.
I use the jet setting on the hose sprayer at about a 45° downward angle to:
-
Lift the coat away from the skin
-
Push loosened undercoat outward
-
Physically move debris off the dog
When the Close–Open–Close process is working correctly and the dog is actively shedding, this is the stage where you’ll actually see the undercoat releasing and literally melting away.
💨 Drying Process (Coat Control + Undercoat Removal)
Drying is not just about getting the dog dry. It’s a continuation of coat work, specifically targeting remaining undercoat, setting coat direction, and preparing the hair shaft for finishing.
I use a K9 III high velocity dryer with a flat nozzle and work at a 30–45° angle, always directing airflow in the direction I want the coat to lay.
That angle is important.
-
Blowing straight into the coat can cause tangling and lift the cuticle unnecessarily
-
Angled airflow allows you to separate the coat while still keeping it controlled and smooth
As I’m drying, I’m also using a stiff pin brush to:
-
Break up clumps of loosening undercoat
-
Help guide coat direction
-
Prevent sections from drying compacted or tangled
The dryer is doing most of the heavy lifting here. The force of the air is actively pushing out loosened undercoat that was released during the bath process. The brushing is there to support that, not replace it.
✨ Product Application During Drying (~80% Dry)
Once the coat is about 80% dry, I introduce a conditioning spray.
At this stage, the coat is still slightly open and receptive, which allows the product to distribute more evenly and effectively.
Envirogroom Pro-Mat (silicone-based) is my go-to when I want:
-
A protective coating on the hair shaft
-
Added slip
-
Repellency against dirt, debris, and environmental damage (including sun exposure)
After applying, I continue drying. The heat and airflow help activate and set the product onto the coat.
If I want a lighter finish, I’ll use something like Artero Mix, which is absorbed into the hair rather than coating it. This gives hydration without altering the natural texture as much.

🪮 Blow-Out & Brush-Out Process (Systematic Undercoat Removal)
Once the coat is fully dry and prepped, this is where I methodically remove the remaining undercoat and refine the finish. I always work head to tail, staying consistent in direction so I’m not reworking areas unnecessarily.
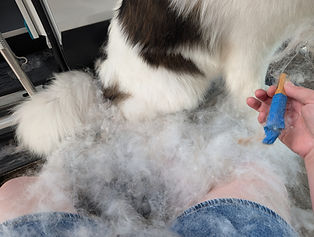
Step 1: Coarse Rake (Initial Pass)
I start with the widest tooth spacing (coarse rake).
At this stage:
-
The coat is still holding a significant amount of loosened undercoat
-
The goal is to remove bulk without resistance
I continue until:
-
The rake begins to glide more freely
-
The amount of hair being removed noticeably decreases
Step 2: Medium Rake (Refinement)
Once the coat starts to open up, I switch to the medium side of the rake.
This step:
-
Targets remaining undercoat the coarse rake didn’t catch
-
Begins refining the coat without overworking it
Again, I’m watching for the same indicators:
-
Easier glide
-
Reduced coat release
~2.jpg)
Step 3: Structural Check (Poodle Comb)
After raking, I use the poodle comb to assess the coat.
This isn’t for bulk removal. It’s for:
-
Identifying clumps
-
Finding tangles or compacted areas
-
Checking overall coat consistency
If the comb catches, that tells me exactly where more work is needed.
Step 4: Fine Work (Targeted Areas Only)
For shorter or more sensitive areas, I switch to finer tools:
-
Legs
-
Face/cheeks
-
Ears
I use:
-
Fine deshedding tools
-
Carding knife when needed
Important here:
Ultra-fine tools are not for full-body use. On dense coat, they can cut or damage the hair if overused.
For Daz specifically, I used a carding knife on his ears to remove loose puppy coat that wasn’t releasing with raking alone.
🔁 Reintroduction of Airflow
After working through the coat with tools, I go back in with the dryer.
Using the flat nozzle again and following coat direction, I:
-
Blow out any loosened coat that was lifted during brushing
-
Re-separate the coat
-
Reset the lay of the hair
🔁 Final Check + Repeat as Needed
I finish with another pass of the poodle comb to confirm:
-
No resistance
-
No clumping
-
Even distribution throughout the coat
At this point, you can repeat steps of this process as needed:
-
Rake → blow → comb → repeat
Until:
-
The undercoat is fully released
OR -
The dog is done tolerating the process 😅
🔄 Maintenance Between Baths
This Blow-out & Brush-out process can be partially repeated between baths for maintenance.
The key difference:
-
Always add light moisture or conditioning spray first
This keeps the cuticle closed and prevents breakage, static and frizz. Dry brushing or blowing without moisture will work against the coat instead of with it.
⏱️ Final Thoughts
Daz’s groom took about 4 hours total!! Obviously, we took a several breaks for Daz to potty stretch his legs, get some water and to rest my back 🤭. I also let him take a nap and air dry a bit before the blow/brush out.
🐾 Want More?
If y’all want, I can do another post breaking down:
-
Double coat shedding cycles
-
Hair growth phases
-
Why undercoat behaves the way it does
Because that’s a whole other deep dive 😅
OKAY! That's all! Let me know if you try this process!
Best regards,
Kirstin and Daz
